Mobile App Test Automation With Appium Framework
Getting Started with Mobile Automation using Appium + Robot Framework
- Set up required Hardware and install all the dependent software pre-requites
- Identify the test cases to be automated in the App
- Identify the Locator of the elements (ID or XPath) in the App
- Write the test cases/test suite in a readable and optimized format
- Integrating the framework with Jenkins
Hardware Prerequisites for Windows
| Requirement | Recommended |
| OS | The latest 64-bit version of Windows |
| RAM | 12 GB RAM or more |
| CPU | Latest Intel Core processor |
| Disk space | Solid state drive with 16 GB or more |
Software Prerequisites
- Java
- Python 3x
- Robot Framework
- Android Studio
- Node
- Appium
Let’s get started with the Android Automation installation and setup
Java
- Download Java Development Kit (JDK) from oracle.com
- Java 8 is Recommended since appium driver (UI Automator viewer) supports only Java 8
Note: If you have any other latest version of Java, then download Java 8 and set Java_home as Java 8
Android Studio
- Download and Install the Latest version of Android Studio from https://developer.android.com/
- Please follow the installation info wizard during Android studio installation set-up and finish
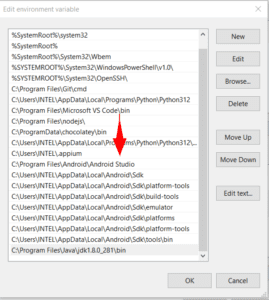
- Set Android_Home and System Path variables as mentioned in the below screenshots
- Go to SDK manager under more actions in Android studio
- Set the Android SDK location and install the required Android version under SDK Platform
- To create an Android Virtual Device, Go to Virtual Device Manager and set up the AVD Name, Model and Android version

Launch Android Virtual Device
Launch a virtual device using the below methods :
Method 1:
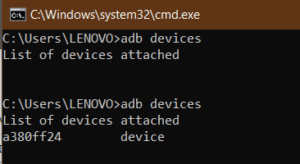
- Open command prompt and run adb devices – It will list out all available virtual devices)
- Click on the play button from the created AVD to launch the Android virtual device
Method 2:
- To see all available virtual devices in Android. Run the command emulator -list-avds
- To launch the virtual device in Android, run the command emulator -avd AVD_Name
Node
Download and Install Node from the official site and set system path variables
- Download Node Prebuilt Installer from this URL: https://nodejs.org/en/download/prebuilt-installer
- Check the node version with the command node -v
- Install NPM using the command npm install -g npm
Appium
Official doc: https://appium.io/docs/en/latest/guides/migrating-1-to-2/
This command installs Appium globally on your system so that you can access it from the command line simply by running the Appium command.
- Installing Appium using NPM command: npm i –location=global appium
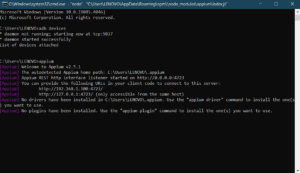
- To start the appium instance, run the command in terminal appium or appium –address 127.0.0.1 –port 4723
- To set base path, run the command appium –base-path=/wd/hub
Note: To Stop Appium Server -> press Ctrl+C in appium terminal
Robot Framework – Appium Library
- Install Robot Framework Appium Library, Run Command pip install robotframework-appiumlibrary
- Install Appium Python Client, Run Command pip install Appium-Python-Client
- Run pip list to check all the installation
Chrome Driver
- To install Chrome driver, run the command appium –allow-insecure chromedriver_autodownload
- The above command will automatically install the compatible Chrome driver version
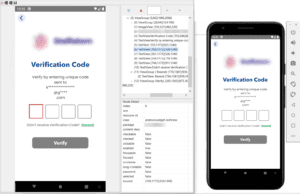
UIAutomator Tool – Inspect the UI on a device
The uiautomatorviewer tool provides a convenient visual interface to inspect the layout hierarchy and view the properties of UI components
To launch the uiautomatorviewer tool:
- Launch the target app on a virtual or physical device.
- Connect the device to your development machine.
- Open a terminal window and Run the tool with this command: uiautomatorviewer
To view the UI properties for your application:
- In the uiautomatorviewer interface, click the Device Screenshot button.
- Hover over the snapshot in the left-hand panel to see the UI components the uiautomatorviewer tool identifies. The properties are listed in the lower right-hand panel and the layout hierarchy in the upper right-hand panel.
Commonly used element locators are Id or XPath. How to write the XPath?
- If class name is: android.widget.EditText and text label is defined then xpath should be like below:
- Xpath: //android.widget.EditText[@Text=” Email ID”]
Steps to Run Appium – Robot framework Test Suite in Real Mobile Device
- Start the Appium server instance in your system
- Enable developer options on your mobile device
- Connect your Android Mobile device to laptop with a USB cable and select the file transfer option
- Run ‘adb devices’ and check the mobile phone is connected.
- In the Test suite file, configure your Device Name
- Now execute the test suite of the mobile app
Important Note/Tips:
- During test suite execution connected mobile device should be unlocked and active
- Appium Server should be in a running state
To find the existing Appium robot framework keywords refer – AppiumLibrary keywords
*** Settings ***
Library AppiumLibrary
*** Variables ***
${AUTOMATION_NAME} UIAutomator2
${APP} ${CURDIR}/Amazon.apk
${PLATFORM_NAME} Android
${APP_PACKAGE} com.amazon.mShop.android.shopping
${APP_ACTIVITY} com.amazon.mShop.splashscreen.StartupActivity
*** Keywords ***
Open App
${status}= Run Keyword And Return Status Open Application http://localhost:4723 automationName=${AUTOMATION_NAME}
… app=${APP} appPackage=${APP_PACKAGE} appActivity=${APP_ACTIVITY} platformName=${PLATFORM_NAME} autoGrantPermissions=true autoAcceptAlerts=true noReset=false
Run Keyword IF ‘${status}’==’False’ Fail Appium Server is not running or Mobile Device is not connected or Mobile App is not Launchable
Go To Amazon Prime
Wait Until Element Is Visible //android.widget.Image[@text=’20 – 21 July’]
Click Element //android.widget.Image[@text=’20 – 21 July’]
Wait Until Element Is Visible //android.widget.Image[@text=’Header’]
Click Element //android.widget.Image[@text=’Header’]
Wait Until Element Is Visible //android.widget.TextView[@text=’Login to join Prime’]
Click Element //android.widget.TextView[@text=’Login to join Prime’]
*** Test Cases ***
T-01 Amazon Prime
Open App
Go To Amazon Prime
Close Application
It’s always a good idea to create low-level keywords to be used again when forming a new keyword. Before performing any action on the elements, it is necessary to wait for those elements to be displayed.
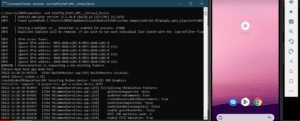
Refer to the demo video of the Appium console log and test execution in app
How will you Identify the test cases to be automated?
Regression suite test cases are the important ones executed manually after every new feature is released and any bug fixes. So this process is repetitive and if you don’t want to execute the same set of regression test cases repeatedly, then why not automate them?
Integrating the Appium and Robot framework with Jenkins
- Integrating Appium with Robot Framework in Jenkins ensures smooth automation and continuous integration.
- Running Appium tests in the cloud offers several advantages like scalability, device diversity, and cost-effectiveness.
- Choosing the right cloud solution depends on your specific requirements such as device coverage, integration capabilities, budget, and support needs. Evaluate each option based on these factors to find the best fit for running your Appium tests in the cloud effectively by integrating with a CI/CD tool
About Author
Keerthana, Senior Software Engineer at Qutrix, is a creative test automation developer and QA expert striking a great balance between the quality assurance and practicality of EngOps. She enjoys exploring new ways for every problem she faces in her role.