React Native Performance Optimization
For developing mobile applications, React Native is one among the popular choices for cross-platform development. It allows developers to write the same components for both Android and iOS, streamlining the development process. Additionally, React Native provides the flexibility to use native APIs by writing platform-specific code in Java for Android and Swift for iOS to handle complex features.
However, many developers feel that the performance and output of React Native apps can be terrible. Common issues include flickering and other performance drawbacks. In this article, we will explore how to improve the performance of mobile applications developed with React Native, aiming to achieve performance comparable to that of native mobile apps.
1. Rendering
Rendering plays a crucial role in providing the best user experience in any application. In mobile applications, frames per second (FPS) is a key metric. An app running at 60 FPS is considered to have good performance. While most mobile apps aim to maintain a minimum of 60 FPS, running multiple asynchronous tasks can exhaust the available threads, leading to a blocked main thread causing the mobile app to freeze. Developers may tend to overlook this aspect when building components and focusing primarily on design.
Does this mean React Native is not suitable for apps with animation features? Not at all. With proper attention to certain aspects, React Native can still deliver an excellent user experience with animations using the Animated component provided by React Native. In this article, let’s see a few key factors to consider to achieve optimal performance in React Native applications.
2. Animations
React Native offers the Animated library, which is recommended for creating smooth and interactive animations. Always use the Animated library for any predictive animation and set useNativeDriver to true when possible. This will offload the animation calculations from JavaScript to the native driver, for better performance.
// Sample Code - Rajesh, Qutrixian

const fadeAnim = useRef(new Animated.Value(0)).current;
useEffect(() => {
  Animated.timing(
     fadeAnim,
     {
        toValue: 1,
        duration: 2000,
        useNativeDriver: true,
     }
  ).start();
}, []);
For unpredictable layout shifts, we can use UIManager.setLayoutAnimationEnabledExperimental for Android. On iOS, these layout animations are handled by the default system without any additional configuration.
// Sample Code - Rajesh, Qutrixian

if (Platform.OS === 'android') {
   if (UIManager.setLayoutAnimationEnabledExperimental) {
      UIManager.setLayoutAnimationEnabledExperimental(true);
   }
}
Best Practices
- Enable UIManager.setLayoutAnimationEnabledExperimental(true) in components when necessary where you need layout animations and avoid redundancy
- Test your app thoroughly to ensure that enabling experimental layout animations does not cause any issues with other components or any third-party libraries
3. Asynchronous Task Management
Always split asynchronous tasks into smaller functions. Avoid running long tasks that require heavy computing and complex calculations. Instead, render appropriate loading components to maintain a better user experience.
4. Dedicated Higher Order Components
Every application often needs to render a list of records. The quickest way to create a list of elements might be to combine ScrollView and View components. However, this approach can become problematic as the data grows. Managing large data sets, infinite scrolling, and memory is crucial for a better user experience.
FlatList is a dedicated component in React Native for displaying and handling large data sets. Even though FlatList uses ScrollView and View components internally, it leverages key-based optimizations and Virtualization concept to minimize extra renders and maintain smooth and fast rendering.
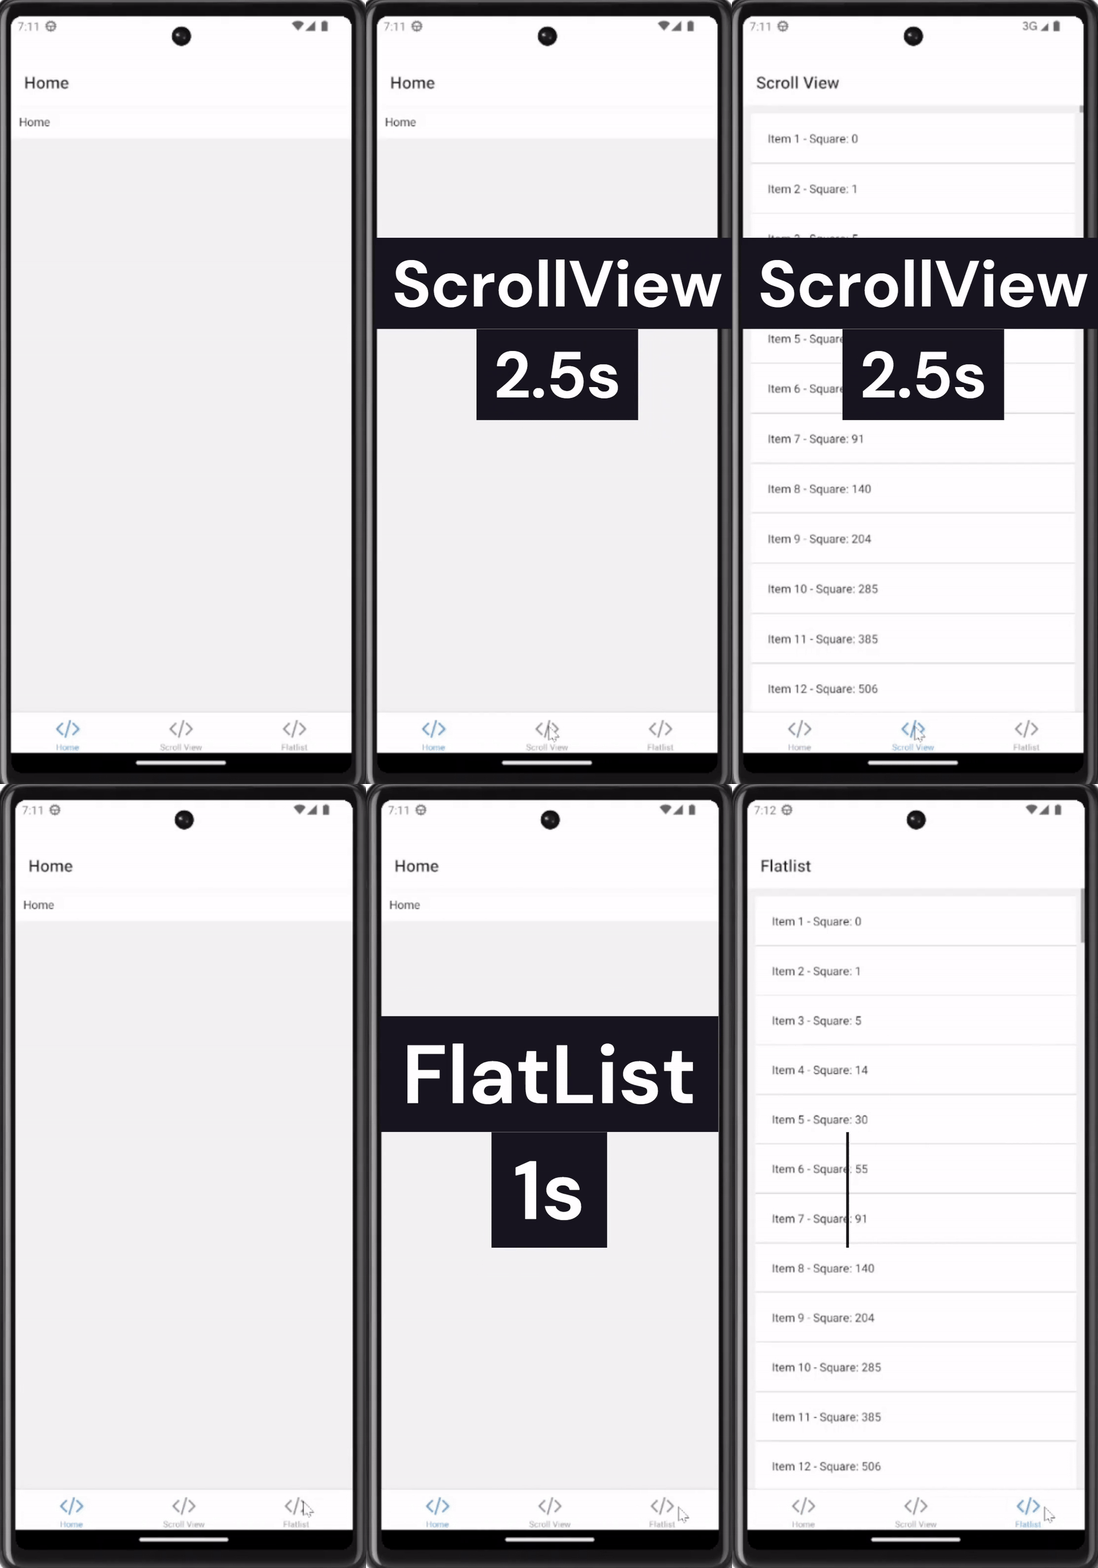
Let’s see an example in ScrollView & FlatList components:
ScrollView Usage
// Sample Code - Rajesh, Qutrixian
export default function ScrollView() {
   const items = Array.from({ length: 1000 }, (_, index) => `Item ${index + 1}`);
   const computeSquare = (index:number) => {
       let square = 0;
       for (let i = 0; i <= index; i++) {
           square += i * i;
       }
       return square;
   };
   return (
     <ScrollView contentContainerStyle={styles.container}>
           {items.map((item, index) => (
               <View key={index} style={styles.item}>
                   <Text>{item} - Square: {computeSquare(index)}</Text>
               </View>
     ))}
   </ScrollView>
   );
};
Flatlist Usage
// Sample Code - Rajesh, Qutrixian
export default function FlatList() {
 const items = Array.from({ length: 1000 }, (_, index) => `Item ${index + 1}`);
 const renderItem = ({ item, index }) => (
   <View style={styles.item}>
     <Text>{item} - Square: {computeSquare(index)}</Text>
   </View>
 );
 const computeSquare = (index:number) => {
   let square = 0;
   for (let i = 0; i <= index; i++) {
     square += i * i;
   }
   return square;
 };
 return (
   <FlatList
     data={items}
     renderItem={renderItem}
     keyExtractor={(item, index) => index.toString()}
     contentContainerStyle={styles.container}
     />
 );
};
Flatlist Demo Video

In the video above, one can see the time efficiency achieved for simple square value rendering. Performance efficiency that can be achieved for complex components using Flatlist will surely worth a try for optimizing the performance of mobile app.
About Author
Rajesh, Software Developer at Qutrix, is passionate about creating efficient and user-friendly software solutions. He feels proud to be a Qutrixian and enjoys coding at work.


